Fusion JLCPCB Export
Public Made by Adomby adom
Export the complete JLCPCB manufacturing package (gerbers + BOM with LCSC + CPL) from a Fusion board, by asking your AI.
Fusion JLCPCB Export
Take a board from Fusion 360 all the way to a ready-to-place JLCPCB order, just by asking your AI. This skill exports the complete manufacturing package (gerber ZIP, BOM with LCSC part numbers, and CPL pick-and-place) from your open Fusion Electronics design, then drives JLCPCB's quote tool in your own logged-in Chrome, all the way through the SMT assembly flow to the final review, so the only thing left for you to do is eyeball it and click order.
Watch the demo
A narrated walkthrough on a real BQ25792 charger: the schematic, board, and 3D view in Fusion, the AI exporting the gerbers, BOM, and pick-and-place, then driving JLCPCB through assembly, parts matching, placement, and the final quote, all from one prompt.
One prompt does the whole thing
Export the JLCPCB files for the board I have open in Fusion, then take it all the way
through the JLCPCB quote in my browser: upload the gerbers, BOM and pick-and-place,
choose SMT assembly, match the parts, check the placement, and stop at the final
review so I can look it over before ordering. Don't submit the order.
That single ask runs the entire sequence below and stops at the last screen without submitting, so you can double-check every step (parts, placement, price) before you commit. Everything here is a real run on a real 4-layer board (a BQ25792 charger), captured end to end.
It runs in your browser, in the background. The AI uses your real, signed-in Chrome (via the Adom browser extension), so the quote is attached to your JLCPCB account and ready to order. It never steals focus or yanks the window in front of you, and it signs you in for you if needed. You are not asked to click anything by hand.
The full walkthrough
Step 1. Gerbers go up and JLCPCB renders the board
You: "Upload the gerbers and show me the board on JLCPCB"
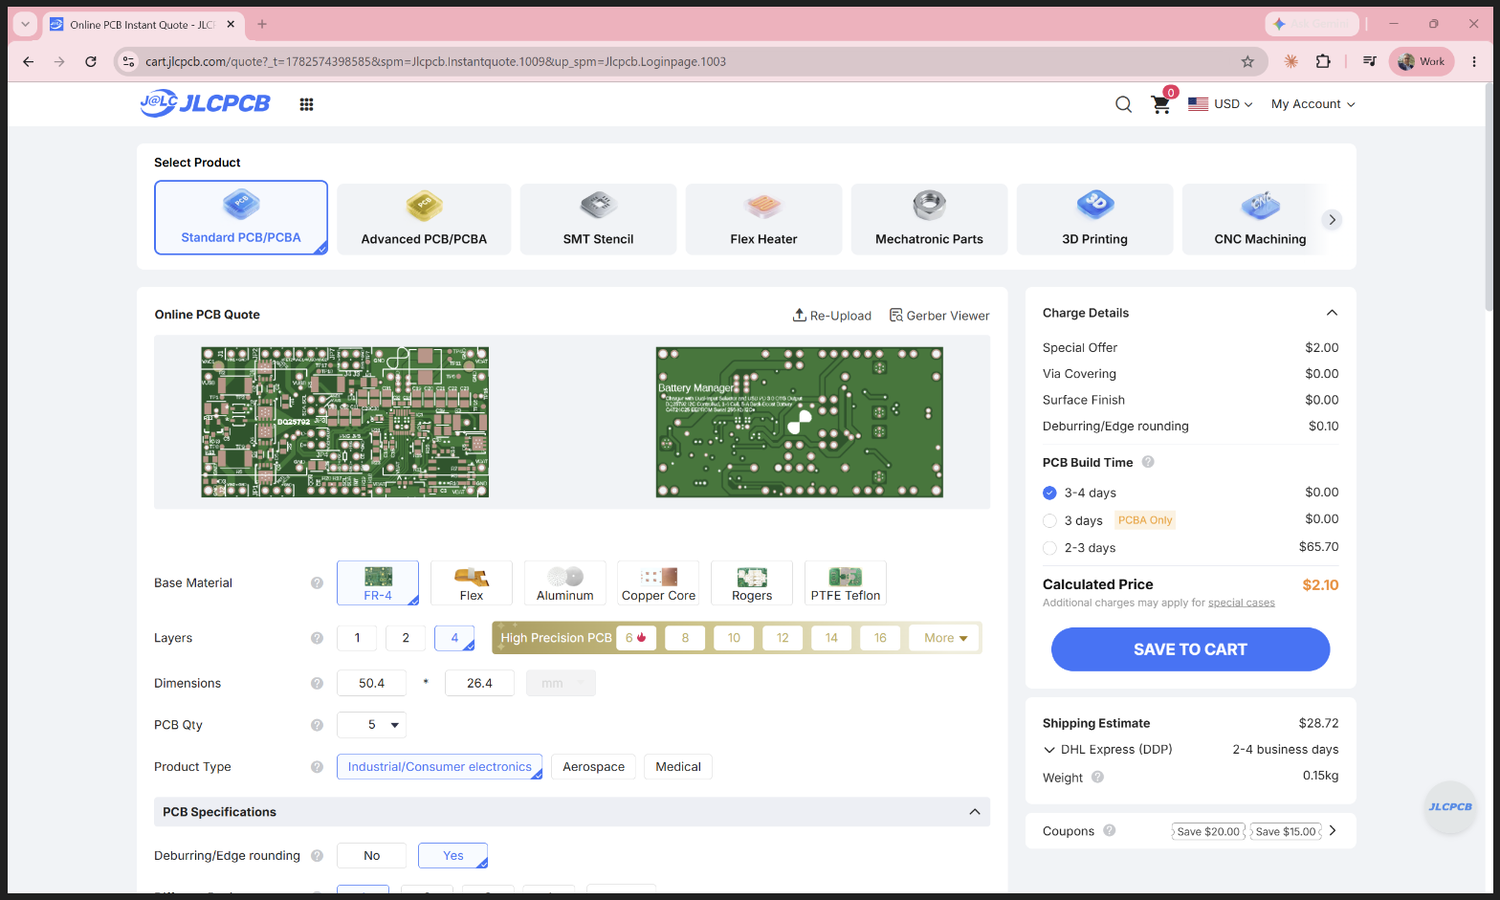
The AI exports the gerber ZIP (fusion_export_gerbers) and uploads it to JLCPCB's quote tool. JLCPCB
auto-detects the stackup (here a 4-layer board, 26.4 x 50.4 mm), picks FR-4, and prices the bare board.
This first part even works anonymously (no login), handy for a quick board render and bare-board price.
Step 2. Choose the PCBA (SMT assembly) option
You: "Turn on SMT assembly, economic, top side"
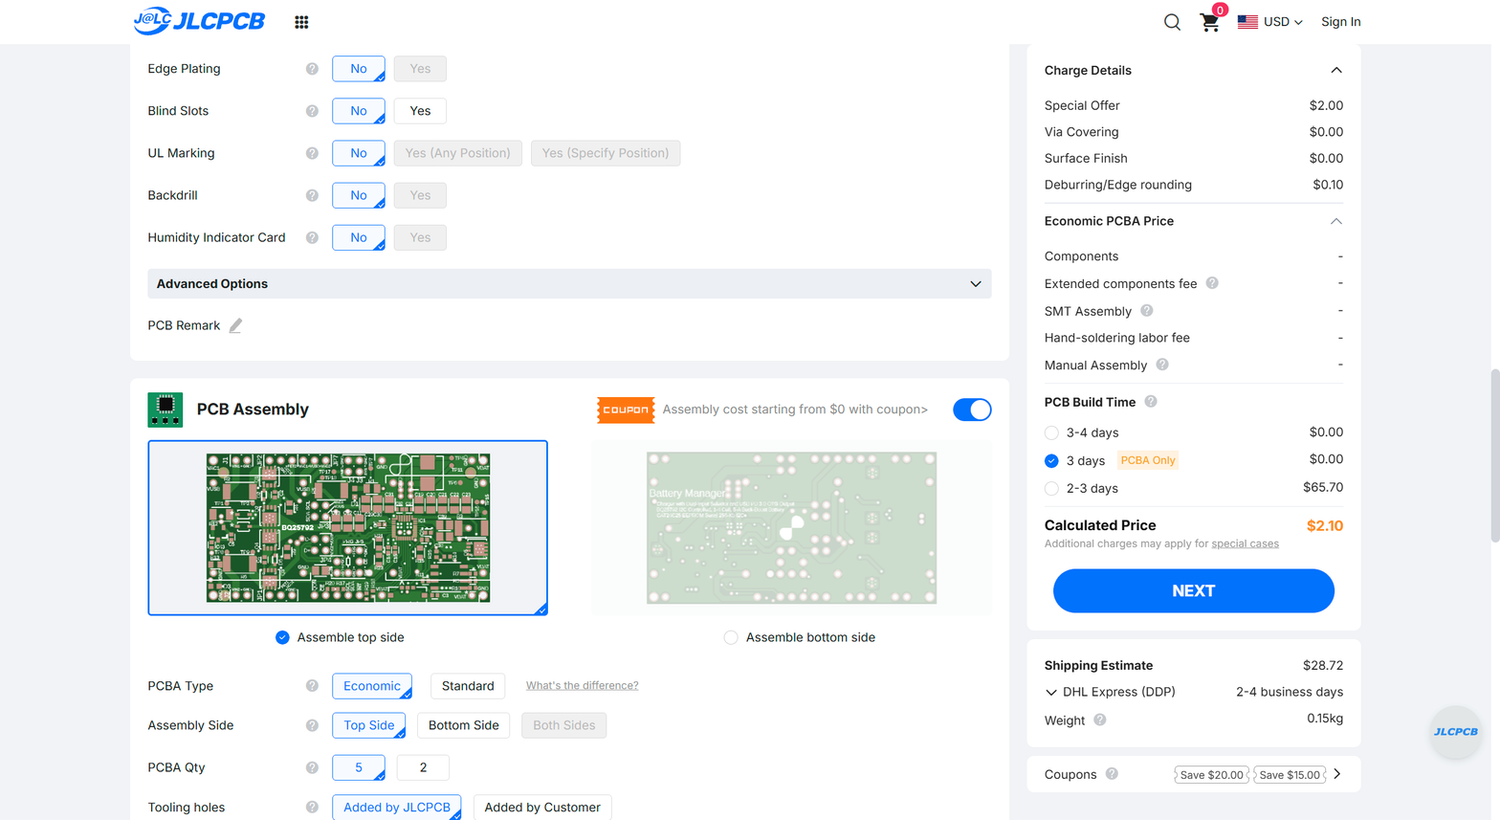
Toggle PCB Assembly on and set the assembly type (Economic vs Standard), the side to populate, and the build quantity. Hitting Next here is where JLCPCB requires a login, which is exactly why the AI drives your own signed-in Chrome from this point on.
Step 3. Upload the BOM and the CPL
You: "Upload the BOM and pick-and-place files"
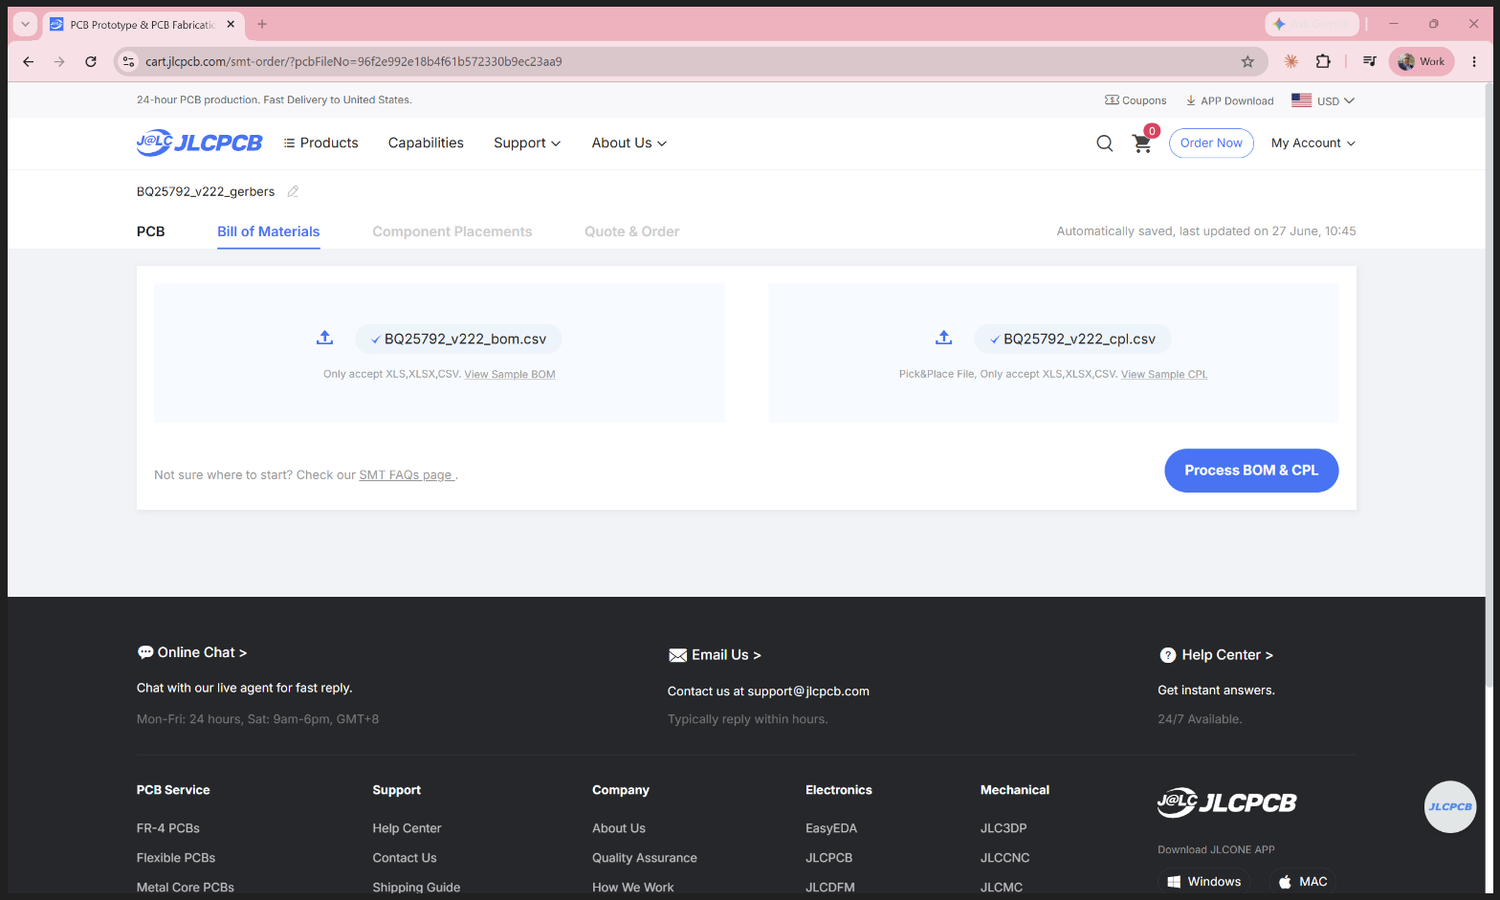
JLCPCB asks for two files: the BOM (what each part is) and the CPL / pick-and-place (where each part goes). The AI uploads both straight from the export, then clicks Process BOM & CPL.
Step 4. Confirm parts are available, and handle the ones that are not
You: "Make sure all the parts are in stock, flag anything that needs a replacement"
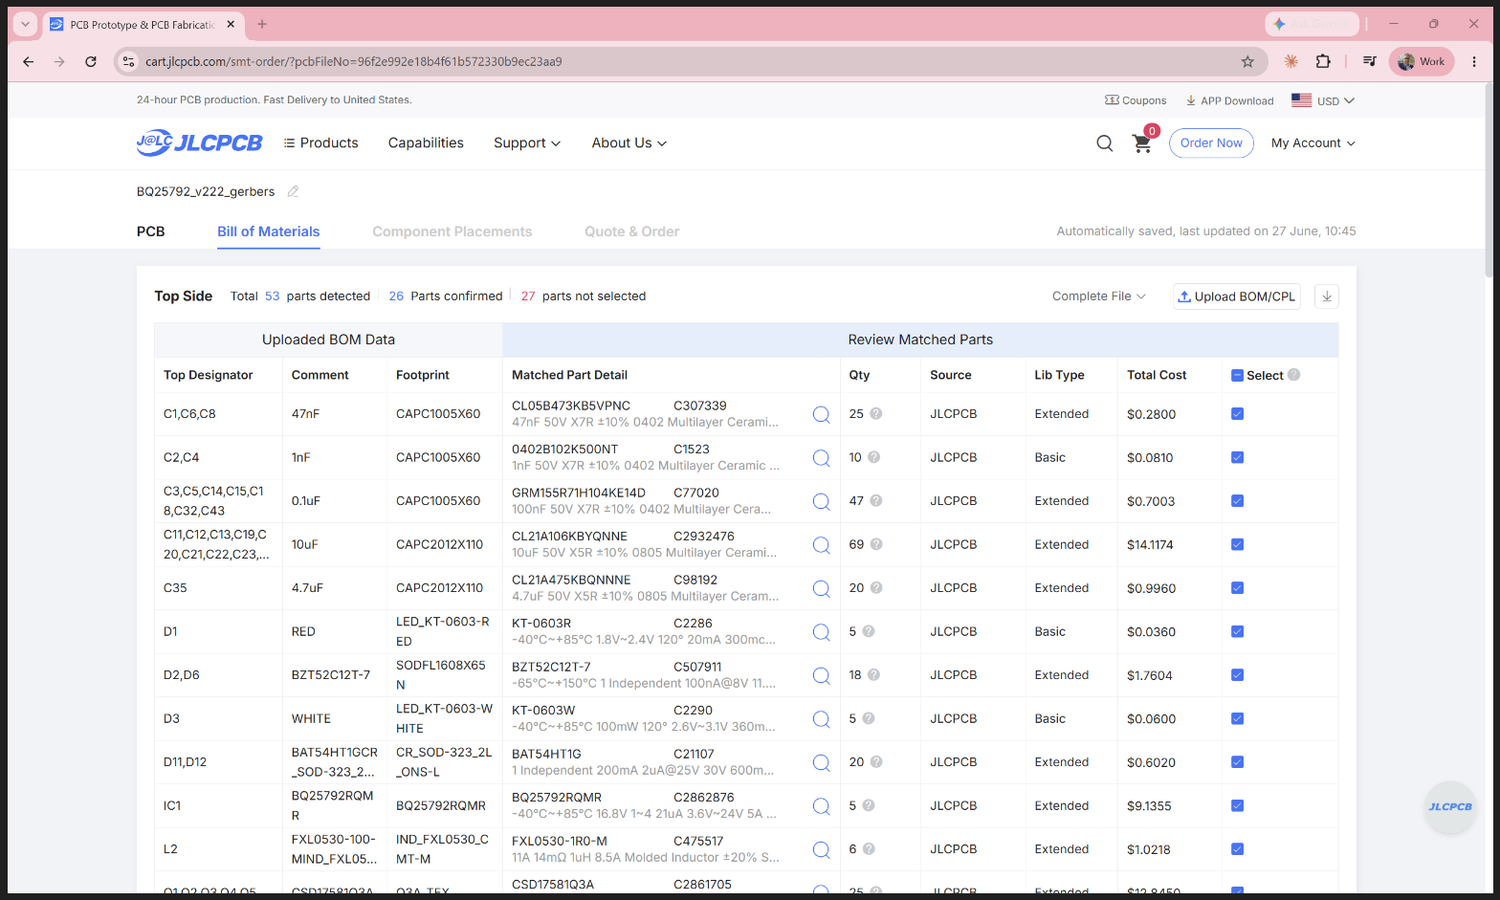
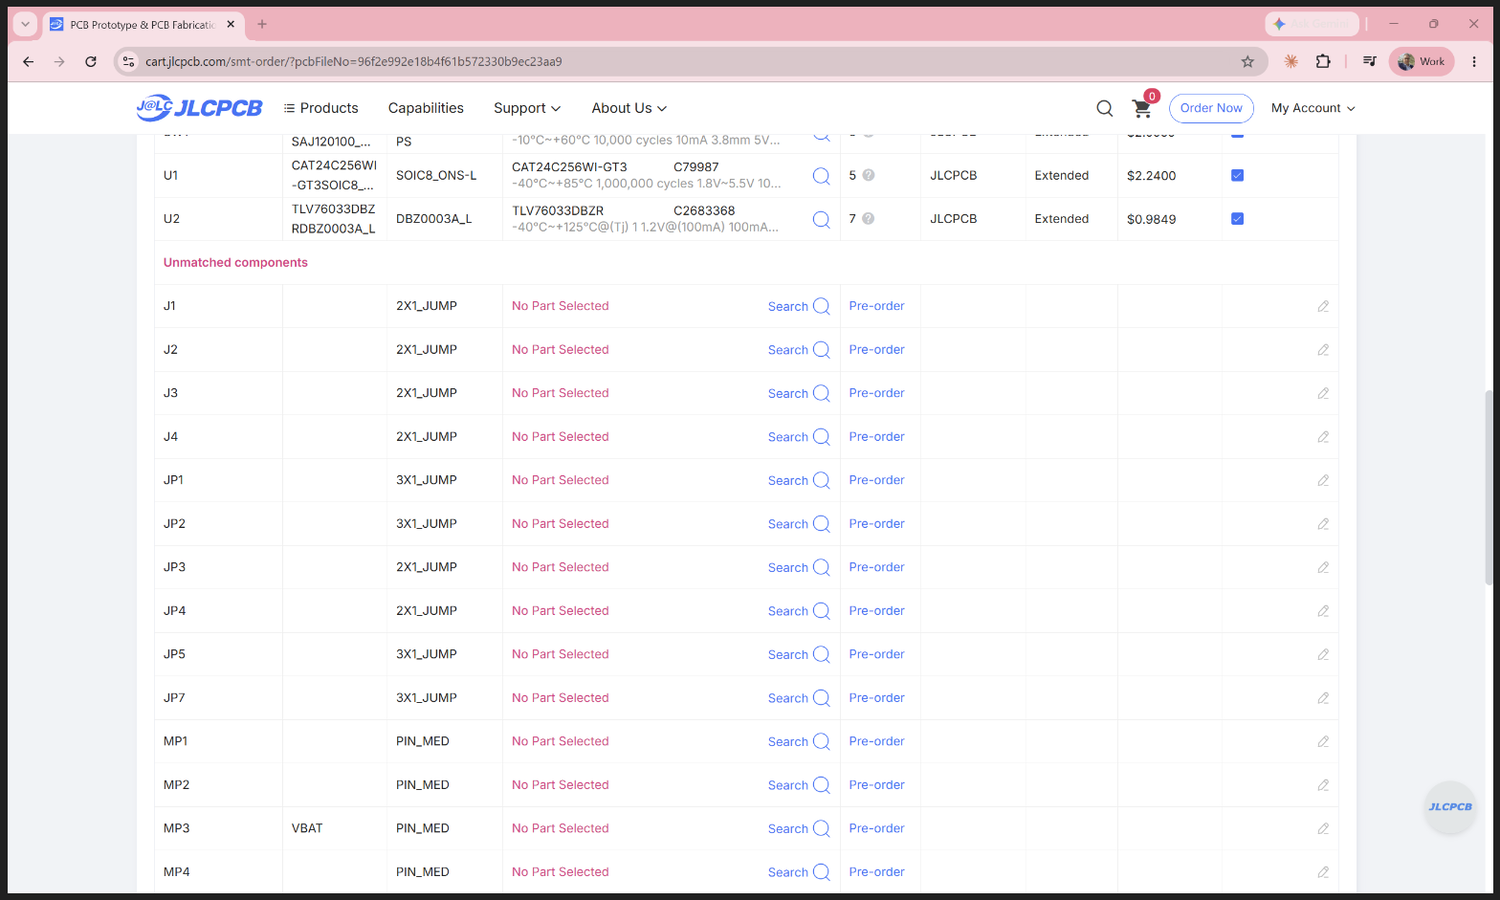
JLCPCB matches every BOM line to a real, in-stock part using the LCSC part number carried in the BOM, no manual searching. You see each part's stock type (Basic/Extended), unit price, and total. Parts it cannot match (here the through-hole jumpers and mounting pads, which are not SMT-assembled) land in an Unmatched components list, where you can search for a replacement, pre-order, or mark them do-not-place:
Step 5. Check the placement and rotation preview
You: "Show me the placement preview so I can verify rotations"
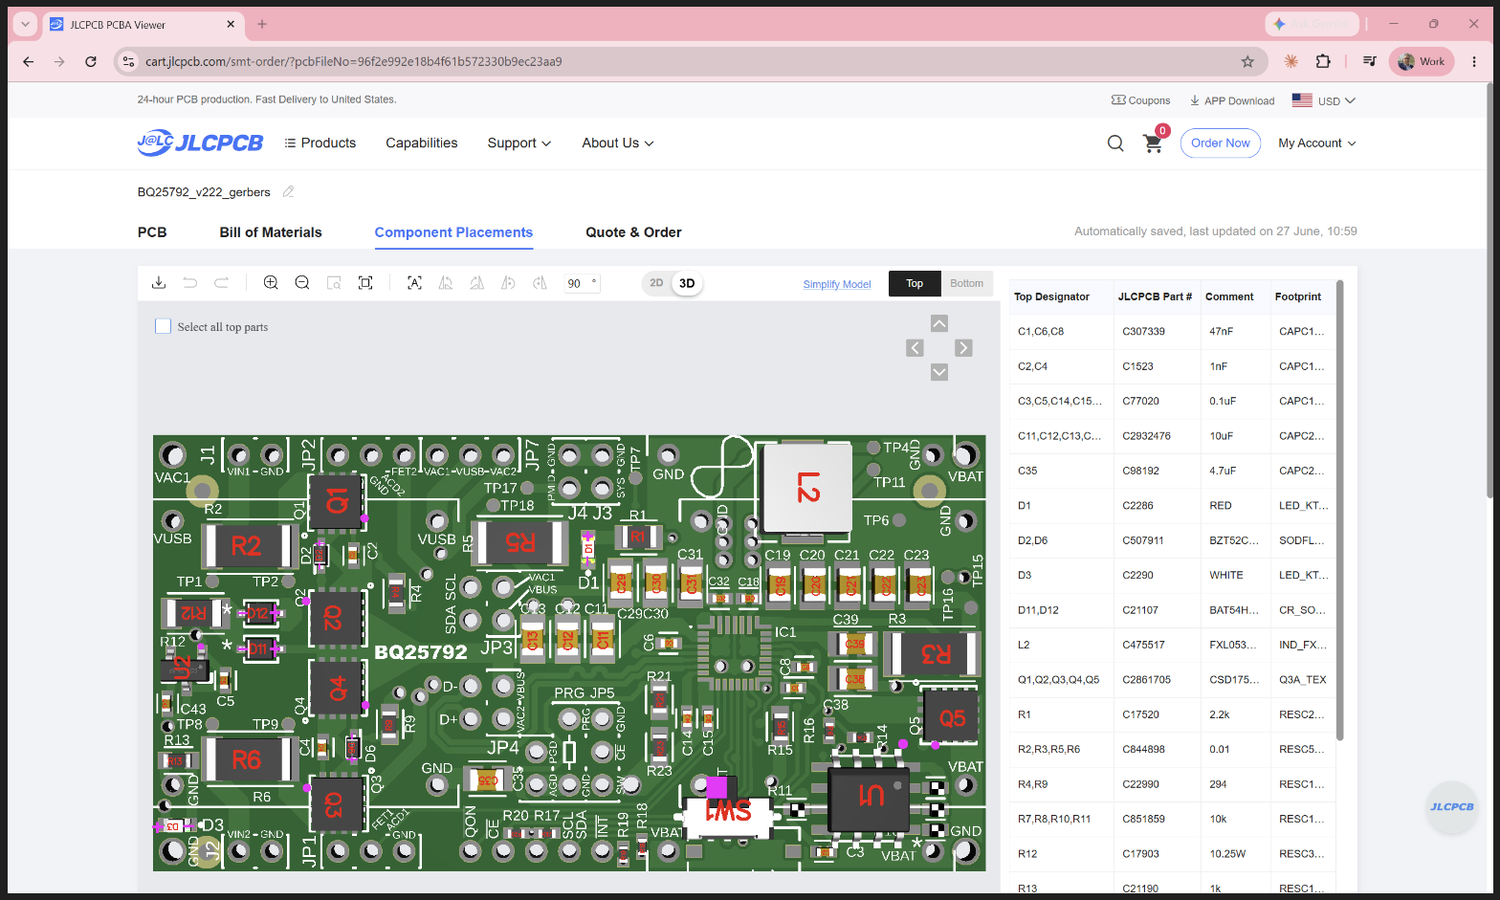
This is the Component Placements step: JLCPCB draws every part on the board at the exact X/Y and rotation
from your CPL, so you can confirm nothing is mis-oriented before assembly. If a part is rotated wrong, you fix
it once with a JLC_ROTATION attribute back in Fusion (see below) and re-export.
Step 6. The final review, ready to order (not submitted)
You: "Take me to the final quote but don't place the order"
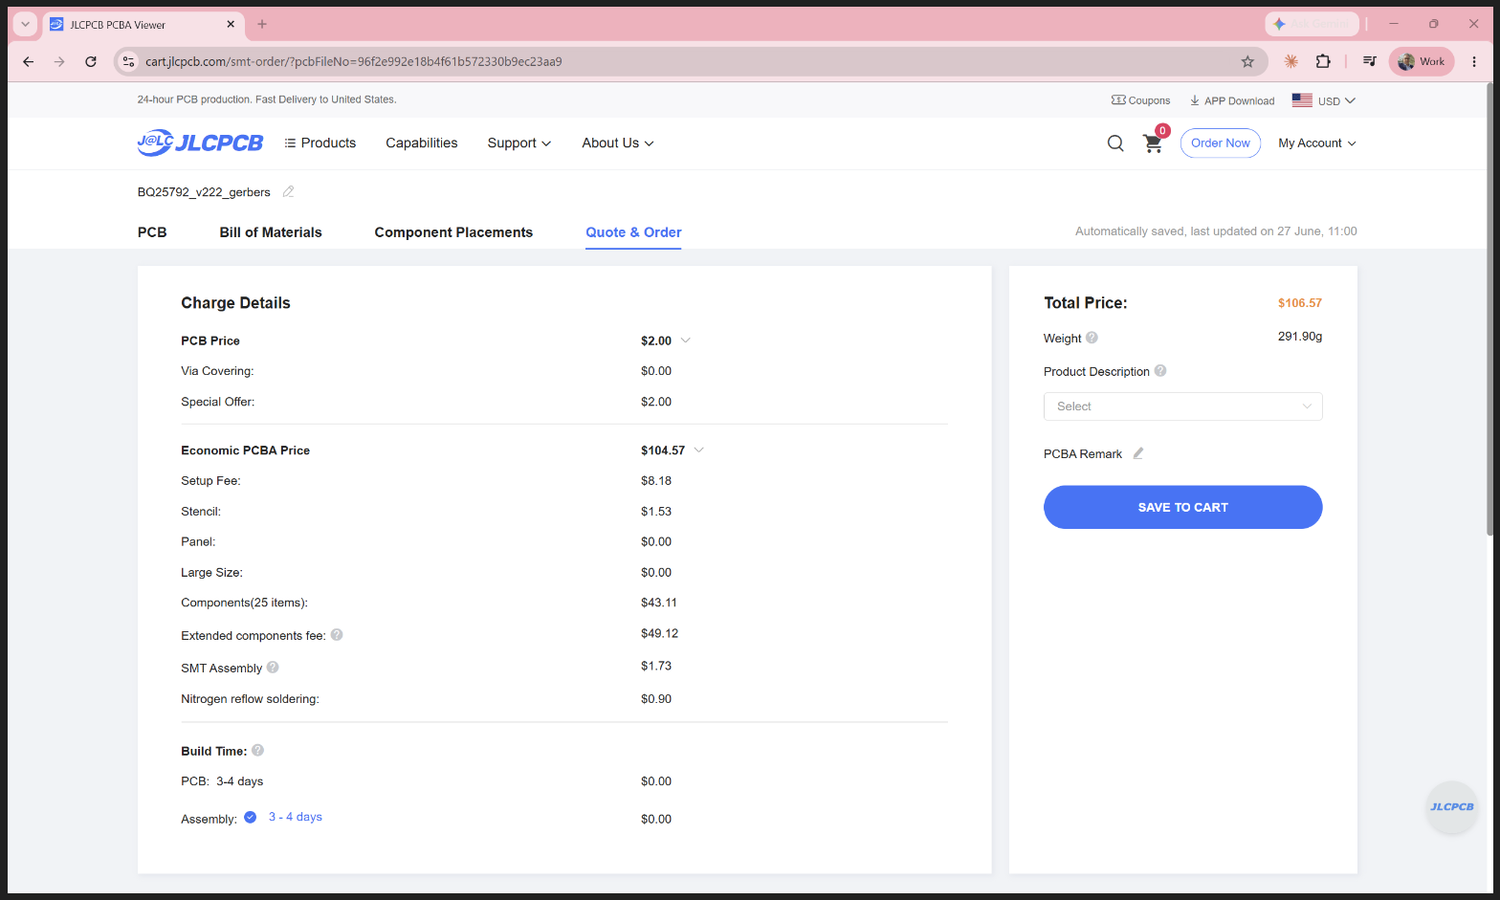
The last screen is the full Quote & Order breakdown: PCB price, PCBA setup, stencil, components, SMT assembly, build time, and the grand total (here $106.57), with a Save to Cart button. The AI stops right here without clicking it, so you review the whole order (parts, placement, price) and place it yourself when you are happy.
What gets exported (the files behind all of the above)
The gerber ZIP
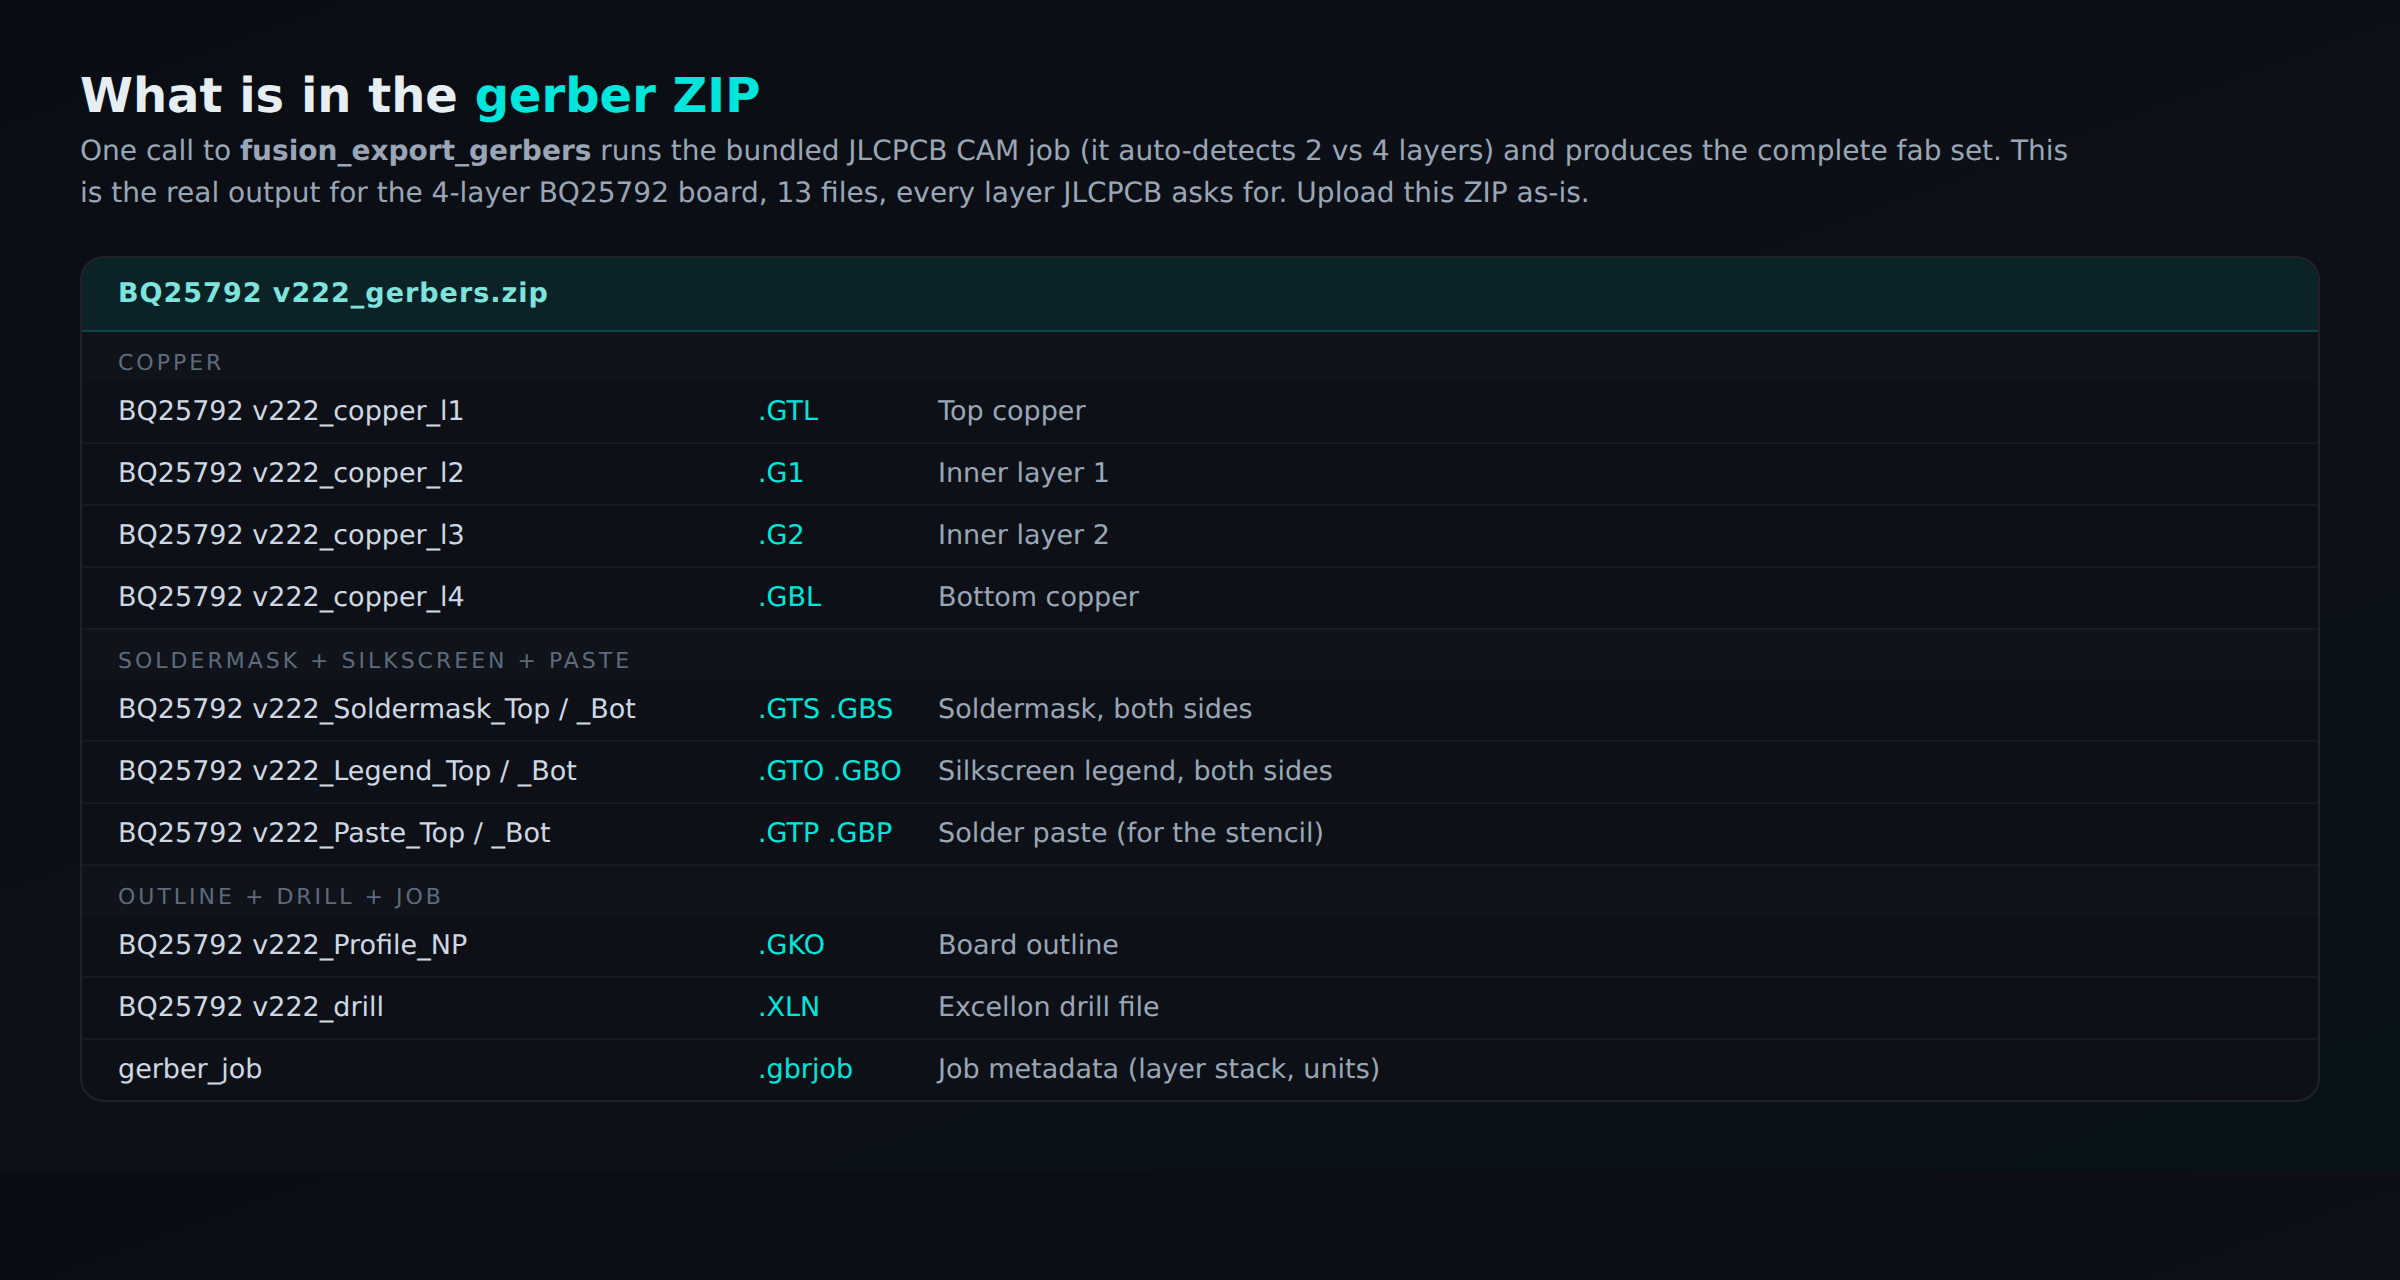
fusion_export_gerbers runs the bundled JLCPCB CAM job (auto 2 vs 4 layer) and writes one ZIP with every
layer JLCPCB needs: copper, soldermask, silkscreen, paste, outline, Excellon drill, and the .gbrjob.
The BOM, with the LCSC part number per component
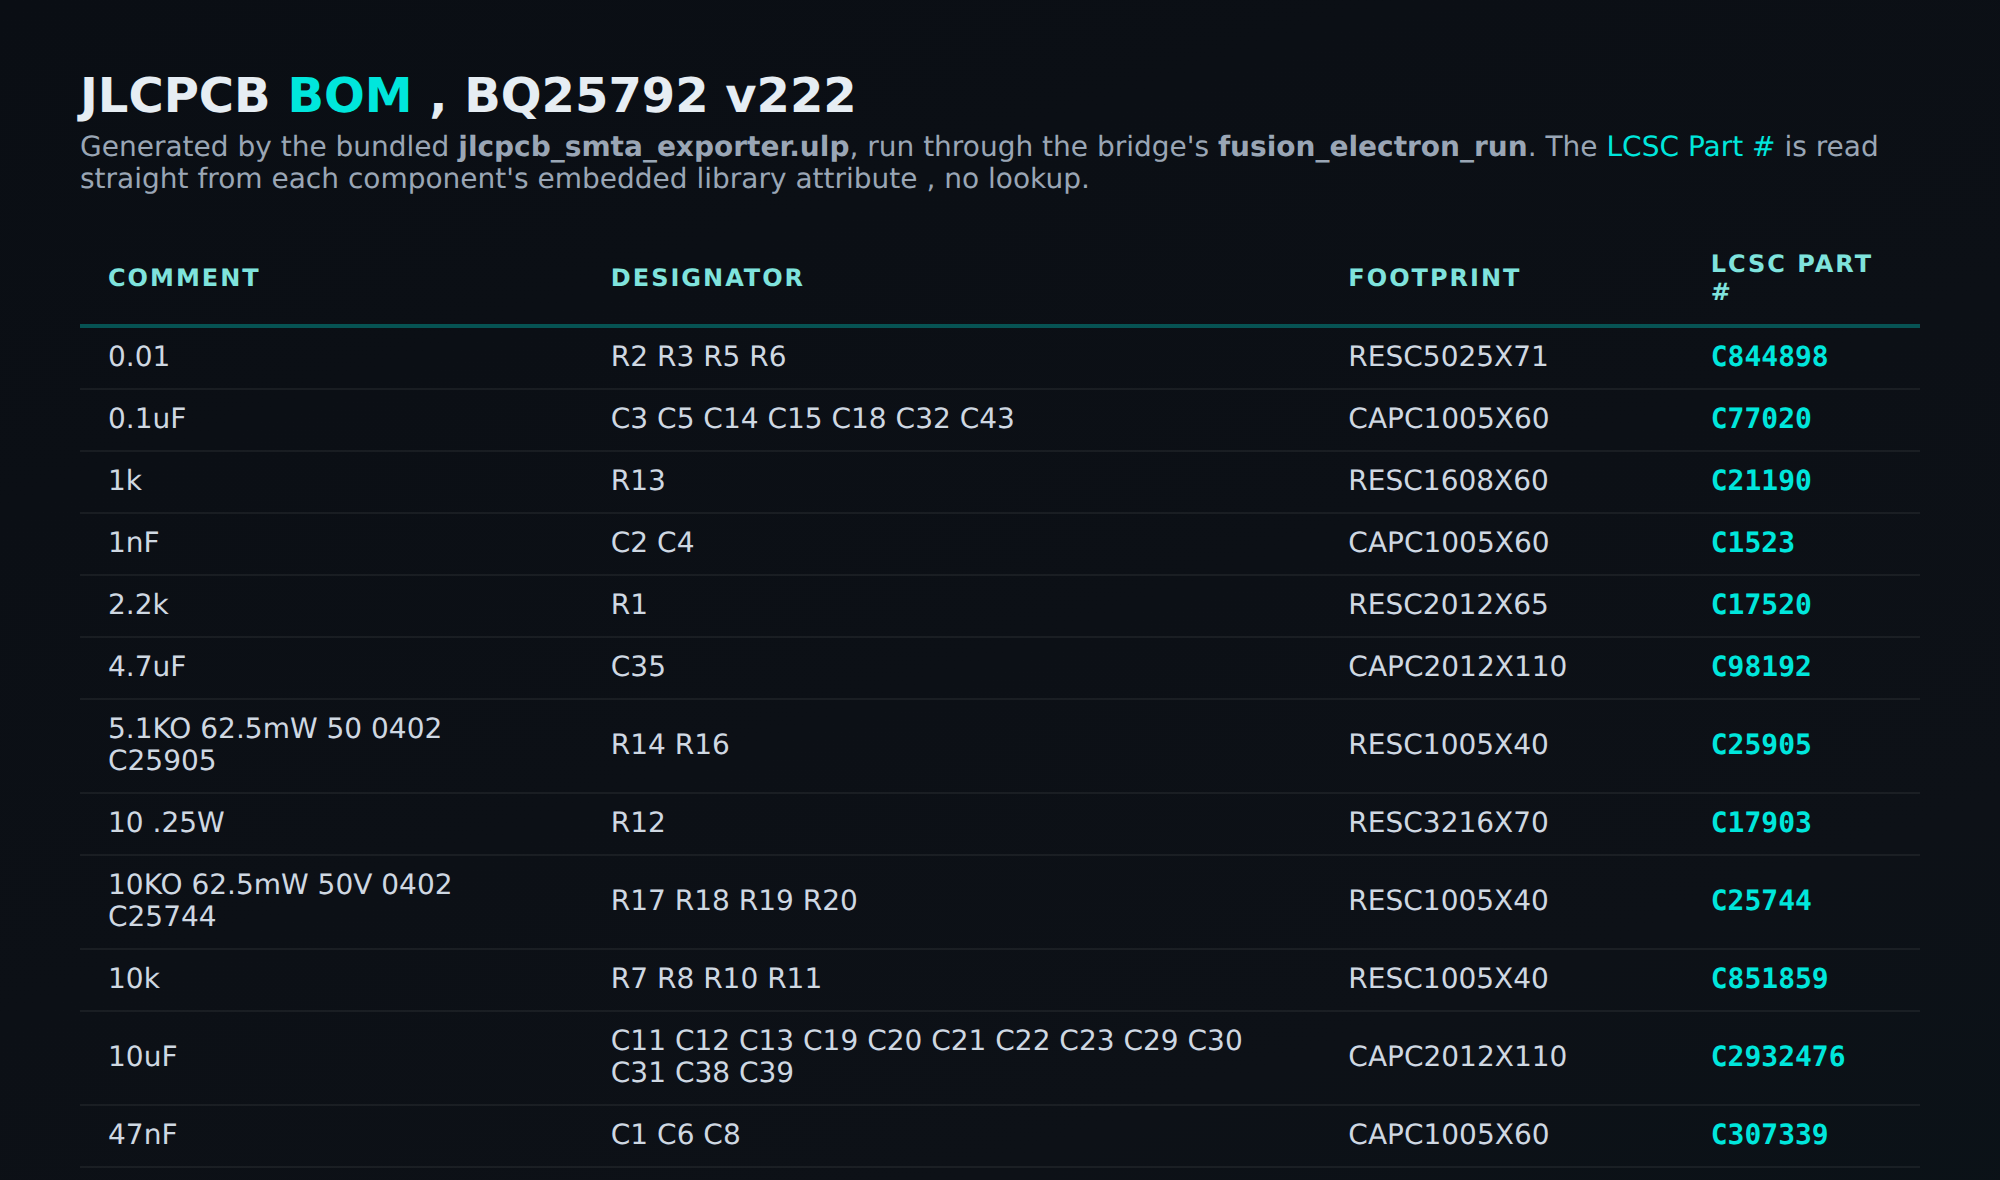
The BOM is Comment, Designator, Footprint, LCSC Part #. The LCSC Part # is read straight off each
component (no lookup), which is what lets Step 4 match every part automatically.
The CPL pick-and-place
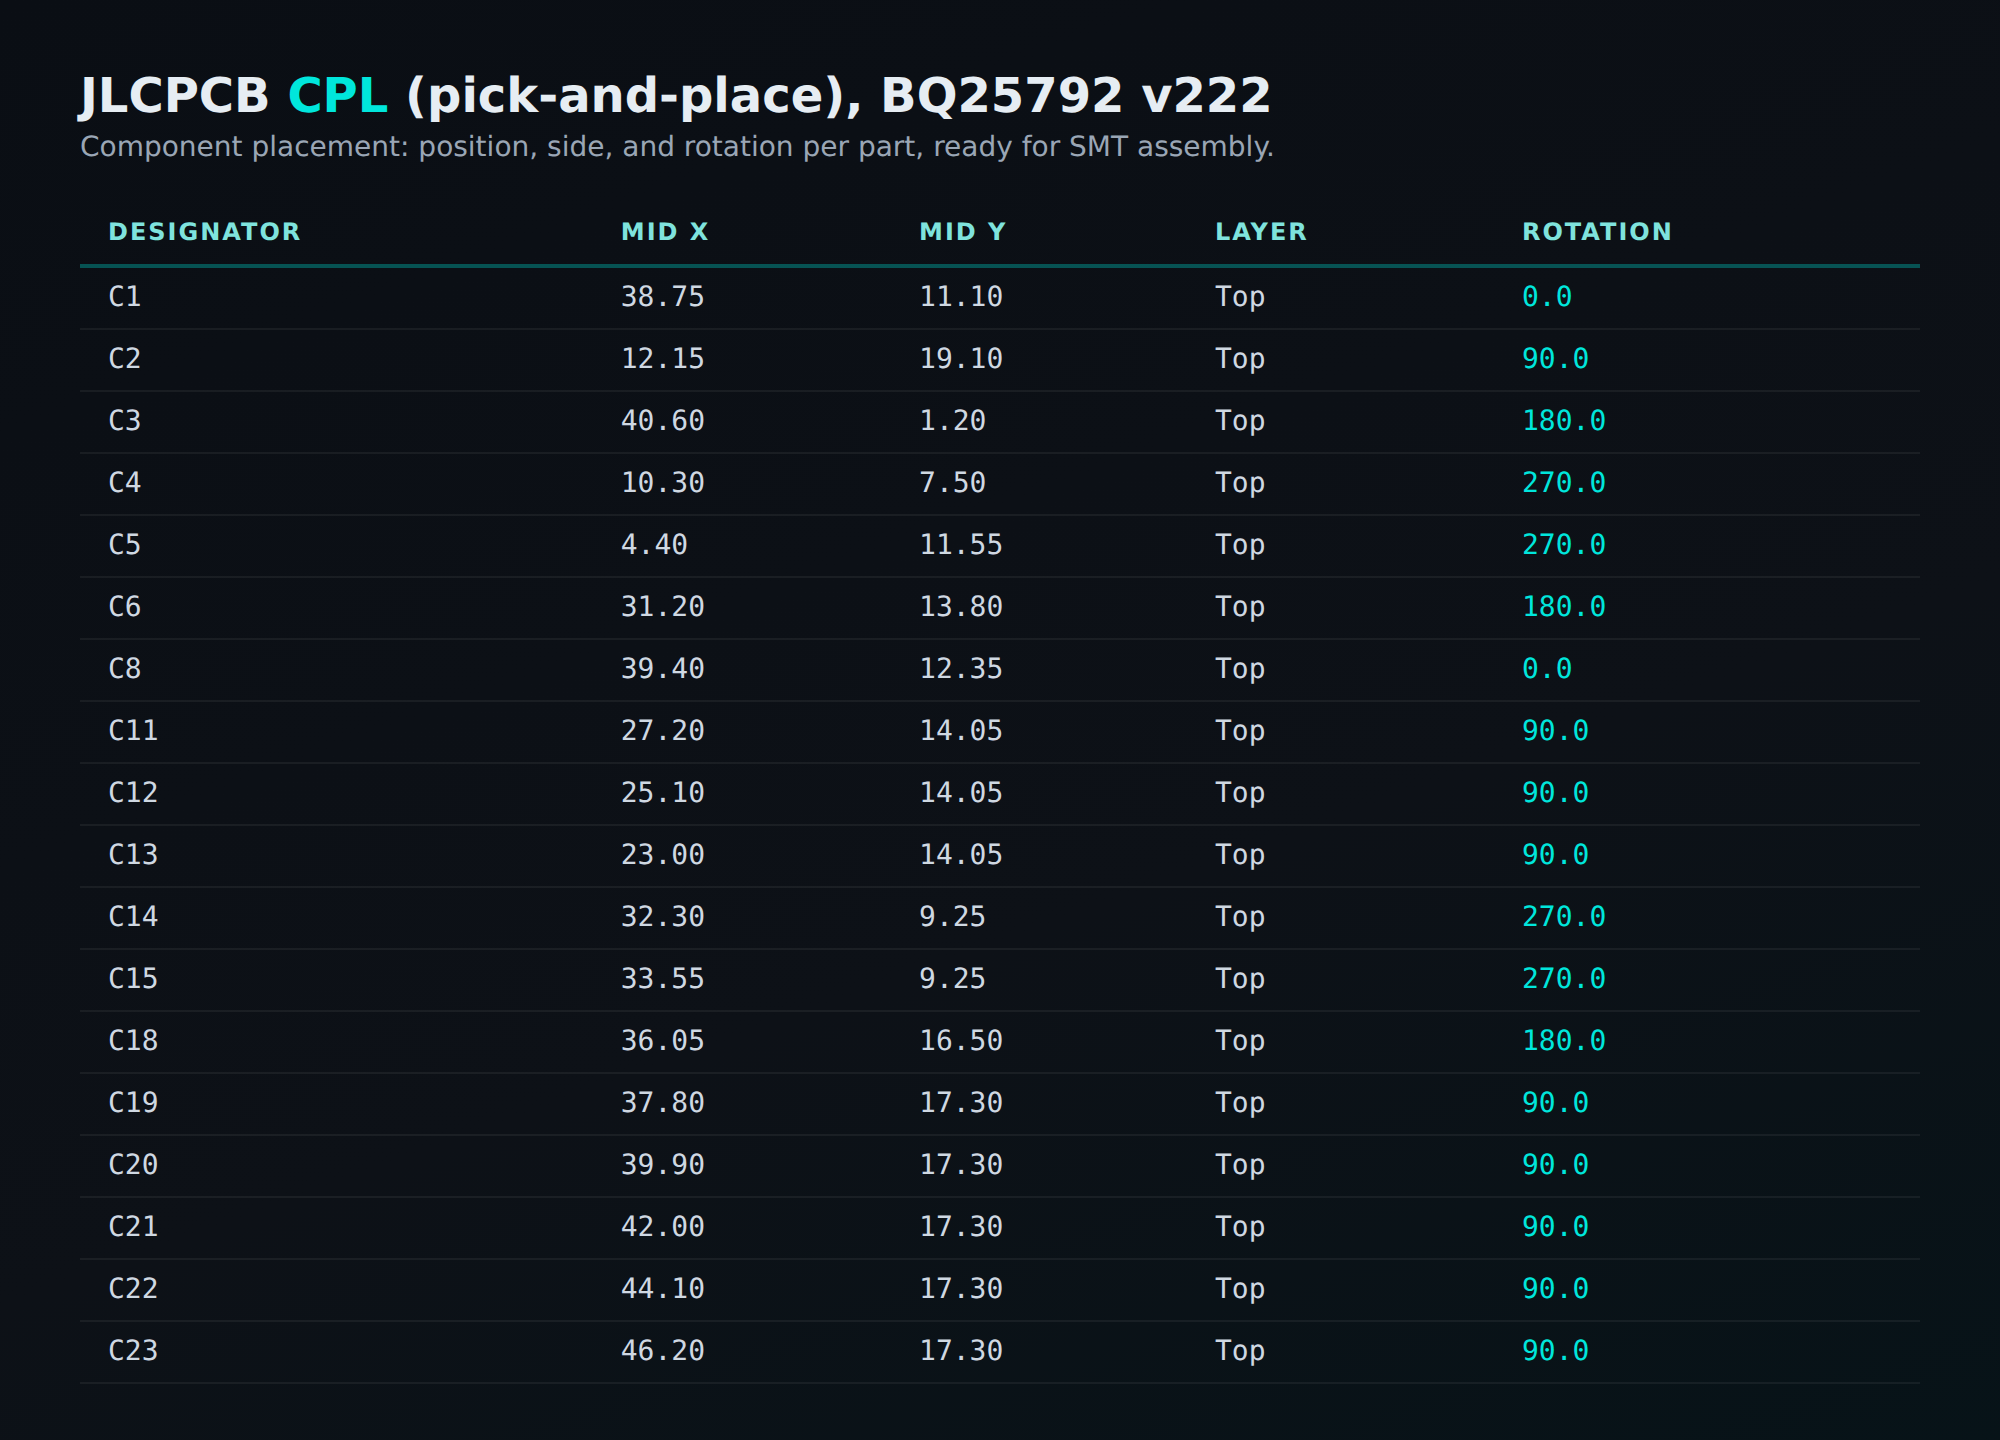
The CPL is Designator, Mid X, Mid Y, Layer, Rotation, the position, side, and rotation of every part, which
is what feeds the placement preview in Step 5.
Where the part numbers come from: component Attributes
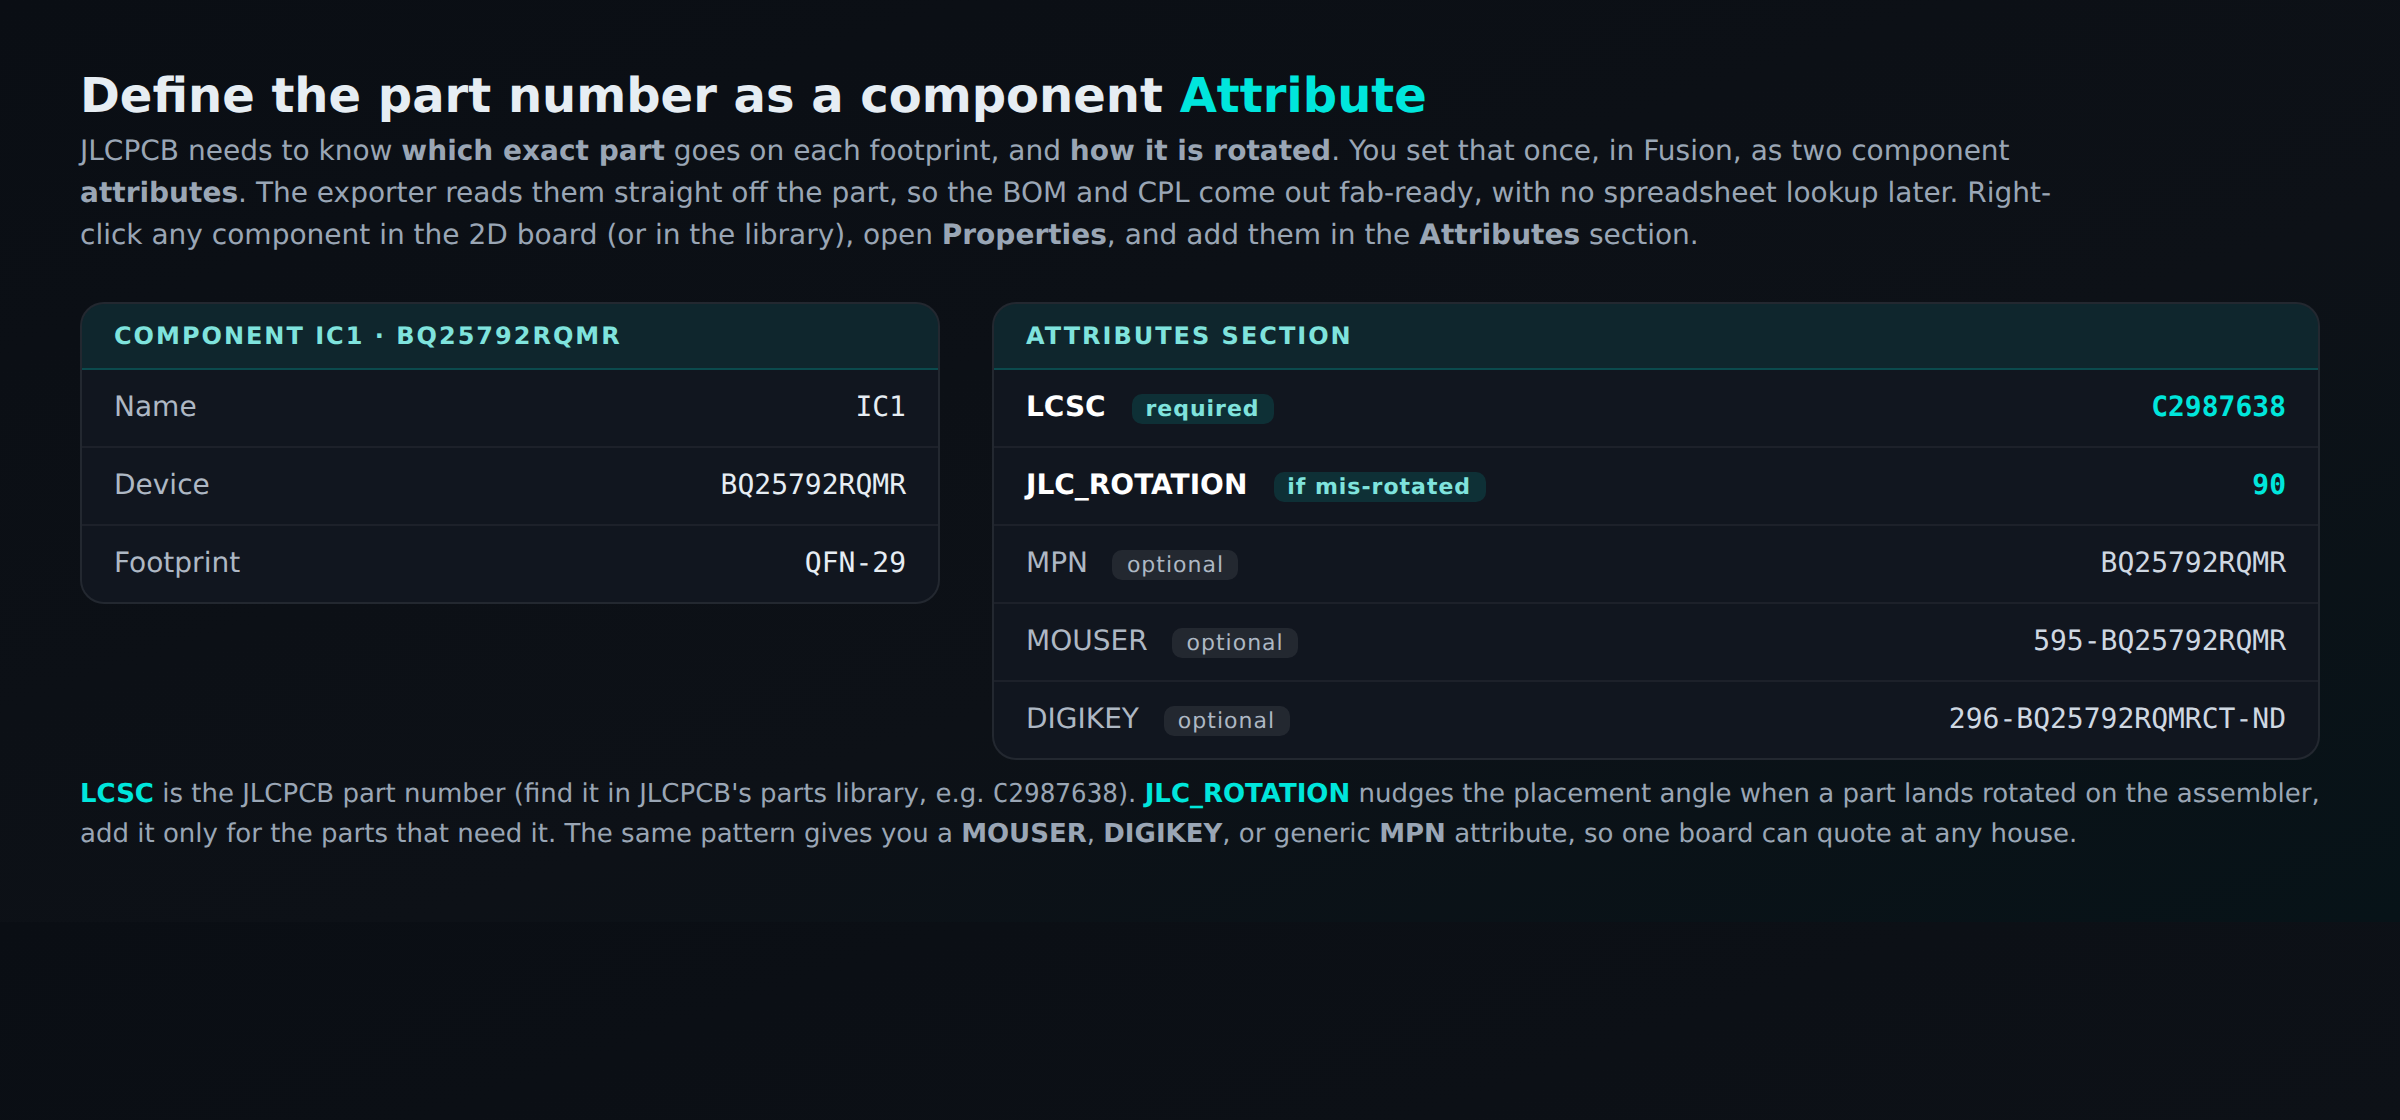
You set this up once in Fusion. Add an LCSC attribute (the JLCPCB part number) and, only where a part
lands mis-rotated, a JLC_ROTATION attribute, on each component via right-click, Properties, Attributes.
The exporter reads them into the BOM and CPL. The same pattern gives you MPN, MOUSER, or
DIGIKEY attributes, so one board can quote at any house.
How the browser automation works (and why it needs almost nothing from you)
- It drives your real Chrome through the Adom browser extension (CDP), so you are already signed in to JLCPCB and the quote is on your account.
- It runs in the background: it never forces the window to the front or steals your focus while you work.
- It signs you in for you if you are logged out (including Google sign-in), so you are never asked to do a step by hand.
- The anonymous board-render in Step 1 uses a headless cloud browser instead, handy for a quick price with no login.
It is also a worked example of extending the Fusion bridge with NO pull request
This skill does not modify the Fusion bridge. It ships its own EAGLE ULP and runs it through the bridge's
generic fusion_electron_run verb. That is the whole
point: anyone can extend the bridge independently, bring a ULP, run it through electron_run, ship it as a
community skill, no fork and no PR. It is linked from the bridge's page via the community breadcrumb trail.
Install
adompkg install adom/fusion-jlcpcb-export
You also need the Adom Desktop Fusion 360 bridge connected with your board open, and (for the live quote) the Adom browser extension in your Chrome.
Credits
BOM/CPL exporter built on OXullo Intersecans' MIT-licensed jlcpcb_smta_exporter.ulp. Gerber CAM job and
fusion_electron_run from the Adom Desktop Fusion bridge.
# Fusion JLCPCB Export
Take a board from Fusion 360 all the way to a **ready-to-place JLCPCB order**, just by asking your AI.
This skill exports the complete manufacturing package (gerber ZIP, **BOM with LCSC part numbers**, and
**CPL pick-and-place**) from your open Fusion Electronics design, then **drives JLCPCB's quote tool in
your own logged-in Chrome**, all the way through the SMT assembly flow to the final review, so the only
thing left for you to do is eyeball it and click order.
## Watch the demo
<video controls width="100%" poster="https://wiki.adom.inc/api/v1/pages/fusion-jlcpcb-export/files/demo/demo-hero.png">
<source src="https://wiki.adom.inc/api/v1/pages/fusion-jlcpcb-export/files/demo/fusion-jlcpcb-demo-v4.mp4" type="video/mp4">
</video>
A narrated walkthrough on a real BQ25792 charger: the schematic, board, and 3D view in Fusion, the AI
exporting the gerbers, BOM, and pick-and-place, then driving JLCPCB through assembly, parts matching,
placement, and the final quote, all from one prompt.
## One prompt does the whole thing
```
Export the JLCPCB files for the board I have open in Fusion, then take it all the way
through the JLCPCB quote in my browser: upload the gerbers, BOM and pick-and-place,
choose SMT assembly, match the parts, check the placement, and stop at the final
review so I can look it over before ordering. Don't submit the order.
```
That single ask runs the entire sequence below and **stops at the last screen without submitting**, so you
can double-check every step (parts, placement, price) before you commit. Everything here is a **real run on
a real 4-layer board** (a BQ25792 charger), captured end to end.
> It runs in **your** browser, in the **background**. The AI uses your real, signed-in Chrome (via the
> Adom browser extension), so the quote is attached to your JLCPCB account and ready to order. It never
> steals focus or yanks the window in front of you, and it signs you in for you if needed. You are not
> asked to click anything by hand.
---
## The full walkthrough
### Step 1. Gerbers go up and JLCPCB renders the board
> **You:** "Upload the gerbers and show me the board on JLCPCB"

The AI exports the gerber ZIP (`fusion_export_gerbers`) and uploads it to JLCPCB's quote tool. JLCPCB
auto-detects the stackup (here a **4-layer board, 26.4 x 50.4 mm**), picks FR-4, and prices the bare board.
This first part even works **anonymously** (no login), handy for a quick board render and bare-board price.
### Step 2. Choose the PCBA (SMT assembly) option
> **You:** "Turn on SMT assembly, economic, top side"

Toggle **PCB Assembly** on and set the assembly type (Economic vs Standard), the side to populate, and the
build quantity. Hitting **Next** here is where JLCPCB requires a login, which is exactly why the AI drives
your own signed-in Chrome from this point on.
### Step 3. Upload the BOM and the CPL
> **You:** "Upload the BOM and pick-and-place files"

JLCPCB asks for two files: the **BOM** (what each part is) and the **CPL / pick-and-place** (where each part
goes). The AI uploads both straight from the export, then clicks **Process BOM & CPL**.
### Step 4. Confirm parts are available, and handle the ones that are not
> **You:** "Make sure all the parts are in stock, flag anything that needs a replacement"

JLCPCB matches every BOM line to a real, in-stock part using the **LCSC part number** carried in the BOM, no
manual searching. You see each part's stock type (Basic/Extended), unit price, and total. Parts it cannot
match (here the through-hole jumpers and mounting pads, which are not SMT-assembled) land in an **Unmatched
components** list, where you can search for a replacement, pre-order, or mark them do-not-place:

### Step 5. Check the placement and rotation preview
> **You:** "Show me the placement preview so I can verify rotations"

This is the **Component Placements** step: JLCPCB draws every part on the board at the exact X/Y and rotation
from your CPL, so you can confirm nothing is mis-oriented before assembly. If a part is rotated wrong, you fix
it once with a `JLC_ROTATION` attribute back in Fusion (see below) and re-export.
### Step 6. The final review, ready to order (not submitted)
> **You:** "Take me to the final quote but don't place the order"

The last screen is the full **Quote & Order** breakdown: PCB price, PCBA setup, stencil, components, SMT
assembly, build time, and the **grand total** (here $106.57), with a **Save to Cart** button. The AI **stops
right here without clicking it**, so you review the whole order (parts, placement, price) and place it
yourself when you are happy.
---
## What gets exported (the files behind all of the above)
### The gerber ZIP

`fusion_export_gerbers` runs the bundled JLCPCB CAM job (auto 2 vs 4 layer) and writes one ZIP with every
layer JLCPCB needs: copper, soldermask, silkscreen, paste, outline, Excellon drill, and the `.gbrjob`.
### The BOM, with the LCSC part number per component

The BOM is `Comment, Designator, Footprint, LCSC Part #`. The **LCSC Part #** is read straight off each
component (no lookup), which is what lets Step 4 match every part automatically.
### The CPL pick-and-place

The CPL is `Designator, Mid X, Mid Y, Layer, Rotation`, the position, side, and rotation of every part, which
is what feeds the placement preview in Step 5.
### Where the part numbers come from: component Attributes

You set this up once in Fusion. Add an **`LCSC`** attribute (the JLCPCB part number) and, only where a part
lands mis-rotated, a **`JLC_ROTATION`** attribute, on each component via right-click, Properties, Attributes.
The exporter reads them into the BOM and CPL. The same pattern gives you **`MPN`**, **`MOUSER`**, or
**`DIGIKEY`** attributes, so one board can quote at any house.
---
## How the browser automation works (and why it needs almost nothing from you)
- It drives **your real Chrome** through the [Adom browser extension](https://wiki.adom.inc/adom/adom-browser-extension)
(CDP), so you are already signed in to JLCPCB and the quote is on your account.
- It runs in the **background**: it never forces the window to the front or steals your focus while you work.
- It **signs you in for you** if you are logged out (including Google sign-in), so you are never asked to do
a step by hand.
- The anonymous board-render in Step 1 uses a headless cloud browser instead, handy for a quick price with no
login.
---
## It is also a worked example of extending the Fusion bridge with NO pull request
This skill does not modify the Fusion bridge. It **ships its own EAGLE ULP** and runs it through the bridge's
generic [`fusion_electron_run`](https://wiki.adom.inc/adom/adom-desktop-fusion-bridge) verb. That is the whole
point: anyone can extend the bridge independently, bring a ULP, run it through `electron_run`, ship it as a
community skill, no fork and no PR. It is linked from the bridge's page via the community breadcrumb trail.
---
## Install
```
adompkg install adom/fusion-jlcpcb-export
```
You also need the [Adom Desktop Fusion 360 bridge](https://wiki.adom.inc/adom/adom-desktop-fusion-bridge)
connected with your board open, and (for the live quote) the
[Adom browser extension](https://wiki.adom.inc/adom/adom-browser-extension) in your Chrome.
## Credits
BOM/CPL exporter built on OXullo Intersecans' MIT-licensed `jlcpcb_smta_exporter.ulp`. Gerber CAM job and
`fusion_electron_run` from the Adom Desktop Fusion bridge.