Brianna's LED Nameplate
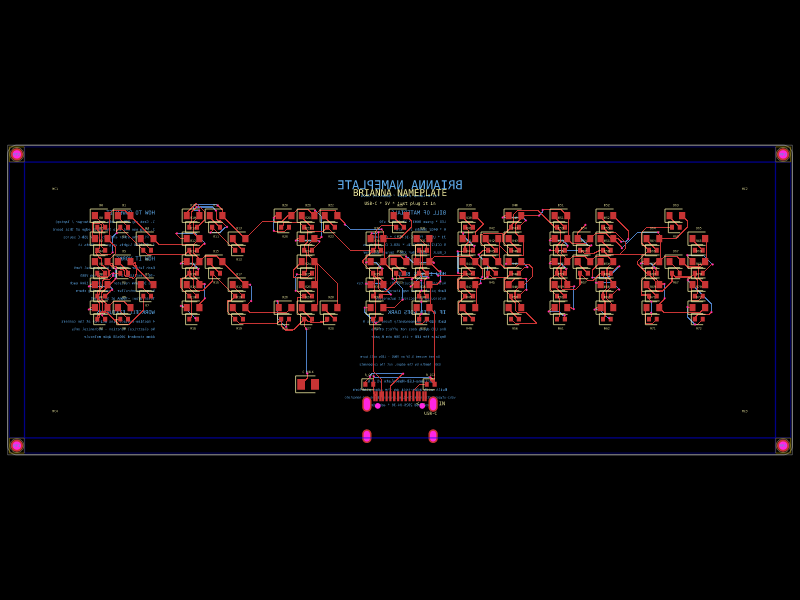
UnreviewedUSB-C-powered desk decoration: spells BRIANNA in ~70 green 0603 LEDs on a 100x38mm FR4 board. No microcontroller — LEDs wire directly to VBUS through individual 300 ohm current-limiting resistors. Bui
3D Model
Symbol & Footprint
Schematic

PCB Footprint
Brianna's LED Nameplate
A USB-C-powered desk decoration that spells out BRIANNA in green
LEDs. Plug a standard USB-C cable into the south edge and the seven
letters light up — no microcontroller, no firmware, no setup. ~700 mA
total on a 5 V rail, well within USB-C limits. Designed as an Adom
molecule so it fixtures into the standard workcell via four corner
machine-contact pins.
For AI handoff: this page is the canonical writeup. If you're an
agent picking up this project, everything you need to continue work
— circuit decisions, BOM, build commands, file layout, known
issues — is on this page. Source lives on the user's container at/home/adom/project/adom-tsci-projects/Brianna-LED-Nameplate/.
Live 3D viewer
The interactive viewer at the top of this page (or the iframe section
below the brief, depending on template) is the full adom-tsci
3D viewer with the project's actual GLB, circuit.json, and
walkthrough loaded. It auto-plays the Walkthrough Demo on load —
component flyovers, USB-C / CC pulldown / status callouts, and the
Nets HUD x-ray view (substrate goes transparent, selected net glows
through the FR4). Use the toolbar to orbit, zoom, switch to PCB or
Schematic views, or open the Components / Nets HUDs manually. Pass?autoplay=off to suppress the walkthrough.

How it works
Each letter is rendered as a 3 × 5 LED bitmap (about 70 LEDs total),
laid out on a 3 mm grid. The font is a simple 3-wide bitmap embedded
in lib/index.tsx as a FONT const — the renderer walks each
letter's pixels and emits one <led> + one <resistor> per lit
pixel. Every LED has its own 300 Ω current-limiting resistor in
series, sized to drive a green LED at ~10 mA from the 5 V USB rail.
The resistors live in the inter-row gap below each LED to keep the
front face of the board clean and readable.
The seven letters themselves are the power indicator — when they're
glowing, the board has 5 V; when they're dark, it doesn't. There is
no separate status LED.

Hardware summary
| Block | Part | JLCPCB | Notes |
|---|---|---|---|
| LEDs | green 0603 (~70 ea.) | — | one per lit pixel of the BRIANNA bitmap; Vf ≈ 2.1 V |
| Resistors | 300 Ω 0402 (~70 ea.) | — | one per LED, sets ~10 mA current |
| USB-C receptacle | TYPE-C-31-M-12 | C165948 | south edge, mouth cantilevered off the board |
| CC pulldowns | 5.1 kΩ 0402 ×2 | — | makes the cable identify the board as a downstream device |
| Bulk decoupling | 10 µF 0805 ×1 | — | smooths inrush as 70 LEDs light up together |
| Workcell pins | 4 × machine contact at corners | — | Adom standard 4-pin molecule fixturing |
Mechanical
- Board: 100 × 38 mm, FR4, 2-layer
- USB-C: south edge, mouth points down (cable plugs in from below
the board so the LEDs face the user) - Workcell-ready: four corner machine-contact pins so the board
fixtures cleanly on the Adom assembly cell - Top silkscreen: "BRIANNA NAMEPLATE" caption above the LED
letters, "5V IN ←" arrow next to the USB-C receptacle, MC1–MC4
corner labels - Bottom silkscreen (extensive — board is meant to explain itself
when flipped over): "HOW TO POWER IT" 4-step list, "HOW IT WORKS"
description, "BILL OF MATERIALS" listing every component family,
"HOW IT WAS BUILT" credit to tscircuit + adom-tsci, "WORKCELL
FIXTURING" pin info, "IF A LED GOES DARK" repair notes, safety
warnings, footer with the wiki URL and Apple-style provenance line
Designed by Adom in Fort Worth, Texas.
Source layout
adom-tsci-projects/Brianna-LED-Nameplate/
  lib/
    index.tsx              ← board source — FONT bitmap, layout, traces
    UsbCReceptacle.tsx     ← TYPE-C-31-M-12 wrapper with rotation-aware cadModel
  package.json             ← @tsci/<author>.Brianna-LED-Nameplate, deps
  tscircuit.config.json    ← entrypoint config
  tsconfig.json            ← TS config, jsx=react-jsx
  walkthrough.json         ← Walkthrough Demo steps (manual, do_not_edit_by_hand)
  dist/lib/index/          ← build output (gitignored)
    circuit.json           ← canonical circuit data
    3d.glb                 ← GLB with 1024-px texture (default tsci build)
    pcb.svg, pcb.png       ← layout renders
    schematic.svg          ← schematic
  .npmrc                   ← @tsci registry pointer
Build commands
# From the project directory:
cd adom-tsci-projects/Brianna-LED-Nameplate

# 1. Install deps (only needed once, or after package.json changes)
bun install

# 2. Build — produces dist/lib/index/{circuit.json, 3d.glb, pcb.svg, schematic.svg}
bunx tsci build lib/index.tsx --glbs --svgs --3d-png --pcb-png

# 3. Preview interactively (Hydrogen webview):
adom-tsci start . --port 8861 --tsci-port 3061 --texture-resolution 4096

# 4. Publish updated viewer to this wiki page:
adom-tsci export-wiki . \
  --slug brianna-led-nameplate \
  --page-type molecules \
  --label "Live 3D viewer"

# Optional flags:
#   --rebuild              force `bunx tsci build` first (slow on dense boards)
#   --texture-resolution N rebake board surface at N×N (4096 typical)
#   --no-upload            produce the .tar.gz only, skip the wiki upload
Color options
Currently rendered in green. Other colors that work with the same
circuit (just swap the LED part and adjust the resistor for the new Vf):
| Color | LED Vf | Suggested R @ 10 mA |
|---|---|---|
| Red | ~2.0 V | 300 Ω |
| Yellow | ~2.1 V | 300 Ω |
| Green (current) | ~2.1 V | 300 Ω |
| Pink (e.g. XL-1608PIC-04) | ~3.0 V | 200 Ω |
| Blue | ~3.2 V | 180 Ω |
| White | ~3.0 V | 200 Ω |
To change color: edit LED_COLOR and R_VALUE constants at the top
of lib/index.tsx, rebuild, re-export.
How to power it (when Brianna receives it in the mail)
- Grab any USB-C cable — phone charger, laptop, USB-C wall wart.
- Plug one end into the south edge of the board.
- Plug the other end into a 5 V USB-C source.
- BRIANNA lights up green.
Same instructions are silkscreened on the bottom of the board, in
case the package gets separated from the docs.
Known issues / lessons learned
- Each net is a 2-port LED↔resistor pair. The board declares
<net name="VBUS"/>and<net name="GND"/>in JSX, but the
autorouter splits each LED's connection into its own pcb_trace so
the Nets HUD lists 75 tiny nets instead of one mega-rail. The
Nets-HUD auto-glow x-ray still works (substrate goes transparent,
picks the largest net), but the highlighted segment is short. For
a more dramatic glow effect, an explicit unified rail would help —
unfilled feature request. - Courtyard overlaps: the autorouter complains about LED+R
courtyards overlapping at the 3 mm pixel pitch. This is cosmetic;
the build still produces valid Gerbers. If it becomes a fab issue,
bump pitch to 3.5 mm and shift R to (LED_x ± 1.5 mm). - Via-spacing DRC warnings: a few via-pairs come out at <0.3 mm
net-to-net spacing. Within most fab DRC; verify before a real
fab run.
Build provenance
@tsci/<author>.Brianna-LED-Nameplate— built with
adom-tsci,
Adom's tscircuit board viewer.- Walkthrough authored manually in
walkthrough.json(the
auto-generator overwrites it; the file's_meta.do_not_edit_by_hand
flag is intentionally false to preserve the hand-edited steps). - 3D viewer bundle exported to this page via
adom-tsci export-wiki
(CLI v1.3.90+).
Files attached to this page
Source — recreate the molecule:
- plan.md — the original design brief, refinements, and out-of-scope notes
- brianna-led-nameplate-source.tar.gz — full tscircuit project source:
lib/,package.json,tscircuit.config.json,tsconfig.json,walkthrough.json,.npmrc,plan.md. Untar andbun install && bunx tsci buildto recreate the GLB, PCB, and schematic from the same source the viewer above is showing.
Build outputs:
- 3d.glb — full 3D model with 4096-px baked board surface
- pcb.svg — flat PCB layout (vector)
- pcb.png — flat PCB layout (raster)
- schematic.svg — circuit diagram
- brianna-demo.mp4 — 30-second narrated demo (early version, recorded before the wiki-embed flow shipped)


Designed by Adom in Fort Worth, Texas.


